

Your skin deserves better than a drugstore lotion that disappears in ten minutes and has you reaching for the bottle again before you’ve even gotten dressed.
I started making my own body butter about a year ago, mostly out of curiosity. And honestly?
PIN FOR LATER 📌

It completely changed how I think about moisturizing.
The texture, the ingredients, the way it actually stays on your skin instead of evaporating the second you apply it… there’s no going back.
This beeswax body butter recipe is the one I keep coming back to. It’s rich without being greasy, deeply nourishing for dry skin, and feels like something you’d pick up at a fancy apothecary (minus the fancy apothecary price tag).
And the whipped version? We’ll get to that. Let’s just say the texture is almost ridiculous.
Here’s how to make it.
Why Beeswax in a Body Butter?
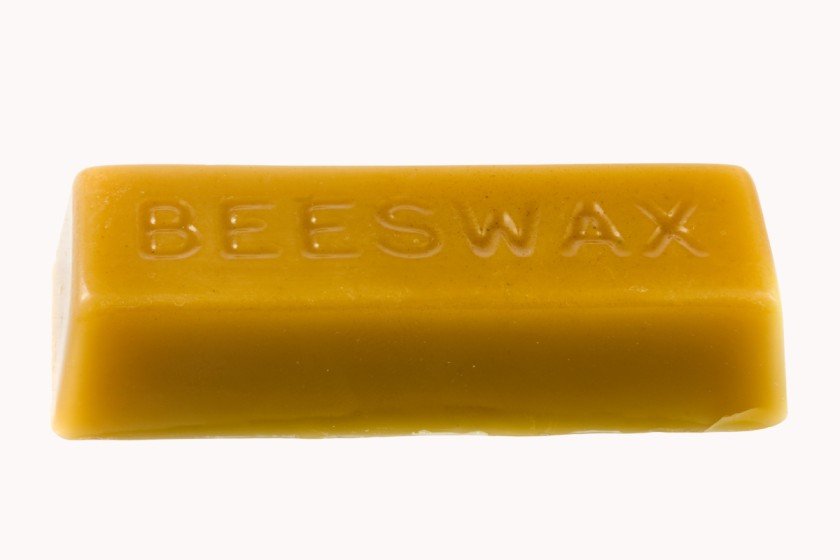
Most homemade body butter recipes skip the beeswax entirely and stick to butters and oils. And those are great!
But adding beeswax changes things in the best way, and there’s actual science to back that up.
A narrative review published in the Journal of Cosmetic Dermatology found that beeswax pulls triple duty in skincare products, working as:
- An occlusive: It forms a protective film on your skin that slows transepidermal water loss, which is the moisture your skin quietly loses throughout the day.
- A humectant: It draws moisture into the skin instead of just sitting on top of it.
- An emollient: It softens and soothes, which is why your skin feels hydrated over time and not just briefly soft after you apply it.
The same review highlighted a clinical study where a beeswax-containing moisturizer beat two commercial barrier creams. A full 98% of participants reported a “good” or “very good” response, while the best-performing commercial cream only hit 67%.
Not even close!
Beeswax that contains propolis also brings some useful extras to the formula:
- Antioxidant protection
- Antimicrobial properties
- Anti-inflammatory benefits
If you’re dealing with dry, reactive, or easily irritated skin, those are more than nice-to-haves.
On top of that, the FDA has designated beeswax as Generally Recognized as Safe (GRAS), research shows it has low comedogenic potential, and allergic reactions are rare.
All in all, it’s a solid pick for most skin types. (For the full deep dive on the research, check out my post on the benefits of beeswax for skin.)
And you get all of that in a body butter you made in your own kitchen.



What You’ll Need
This natural body butter recipe uses a short, purposeful list of ingredients, and every single one is pulling its weight.
If you’ve already made my beeswax lotion bars, you’ll have most of these on hand.
Makes about 5 oz of classic body butter (the whipped version fills roughly twice as many jars)
- Beeswax pellets: Holds everything together and gives the formula its staying power on your skin. A little goes a long way here, since body butter should feel luxurious, not waxy.
- Shea butter: The heart of this recipe. Shea butter is deeply moisturizing, packed with fatty acids, and absorbs beautifully. It’s especially good for very dry skin and helps smooth uneven texture over time.
- Cocoa butter: Adds richness and a faint, natural chocolate scent that makes your body butter smell amazing before you’ve added a single drop of essential oil. (Yes, you will want to eat it. Please don’t.) It also softens skin and gives the formula body without making it heavy.
- Mango butter: The lighter, more delicate butter in the mix. Mango butter feels silkier than shea or cocoa and helps balance out their richness. It’s also excellent for sensitive skin.
- Coconut oil: Adds slip and a lightweight feel, and helps everything blend smoothly when you whip it. It also brings natural antimicrobial properties along for the ride.
- Essential oils: Completely your call. Lavender is a classic for a reason. Rose and geranium feel soft and grounding. Peppermint is energizing. Sweet orange is pure joy in oil form.
- Raw honey (optional): A small amount takes this to the next level. Honey is a natural humectant, so it pulls moisture into your skin instead of just sitting on the surface.
Equipment
- A double boiler (or a heatproof bowl set over a saucepan of simmering water)
- A hand mixer or stand mixer with a whisk attachment (for whipped body butter)
- A silicone spatula
- A kitchen scale or measuring spoons
- Clean glass jars or tins for storing
Two Ways to Make It
This recipe works two ways: a classic, firm body butter or a whipped body butter with that cloud-like, mousse texture you’ve definitely seen all over Pinterest.
I’ll walk you through both.
The Basic Recipe
- 1 tablespoon beeswax pellets
- 3 tablespoons shea butter
- 2 tablespoons cocoa butter
- 2 tablespoons mango butter
- 2 tablespoons coconut oil
- 20 to 25 drops essential oils of your choice
- 1 teaspoon raw honey (optional)
How to Make Classic Beeswax Body Butter
Step 1: Set up your double boiler
Fill a small saucepan with about an inch of water and set a heatproof bowl on top, making sure it doesn’t touch the water. Bring it to a gentle simmer over low heat and keep it there. Patience is the whole game with homemade body butter. Low and slow protects your ingredients, especially the more delicate butters.
Step 2: Melt the beeswax first
Add the beeswax pellets and let them melt completely before adding anything else. Beeswax has the highest melting point of all the ingredients, so it needs a head start. Stir occasionally and give it around 5 minutes.
Step 3: Add the cocoa butter and shea butter
Once the beeswax is fully melted, add the cocoa butter and shea butter. Stir until smooth and combined. The mixture will turn a deeper golden color and smell absolutely wonderful at this point. (Resist the urge to lick the spatula.)
Step 4: Add the mango butter and coconut oil
Stir in the mango butter and coconut oil. Both have lower melting points, so they’ll blend in quickly. Keep stirring until the mixture is completely even and glossy.
Step 5: Remove from heat and add essential oils
Take the bowl completely off the heat before adding your essential oils. Heat destroys their volatile compounds, which means you lose both the scent and the skin benefits. Add your drops, stir well, and mix in the honey now if you’re using it.
Step 6: Pour into jars and chill to set
Pour into clean jars or tins, then pop them in the fridge for about 30 minutes to an hour until firm. Cooling it quickly helps the shea butter set smooth. If it cools too slowly, the butters can crystallize and leave you with a grainy texture. (Totally safe to use, just less dreamy.) Once set, store at room temperature.
How to Make Whipped Body Butter
For the whipped version, follow Steps 1 through 5 above. Then, instead of pouring straight into jars:
Step 6: Chill the mixture until semi-solid
Pour the mixture into a large mixing bowl and chill it in the fridge, checking every 10 to 15 minutes, until it looks opaque and has the consistency of soft coconut oil. You want it firm enough to whip but not fully set.
Step 7: Whip it
Using a hand mixer or stand mixer, whip on medium-high speed for 3 to 5 minutes until light, fluffy, and mousse-like. It will roughly double in volume and turn a pale, creamy color. This is where the magic happens.
Step 8: Transfer to jars
Spoon the whipped body butter into jars. It won’t pour like the classic version, so use a spoon or spatula. Store at room temperature.
How to Use Your Body Butter
Scoop a small amount out with your fingertips and warm it between your palms for a few seconds before applying.
It melts on contact and absorbs within a couple of minutes.
For maximum moisture, apply it right after a shower while your skin is still slightly damp. Focus on dry areas like elbows, knees, heels, and shins. A little goes a long way with this formula, which is part of what makes it so worth making.
Want to level up? Exfoliate first with this DIY coffee body scrub, then follow with your body butter. Your skin will thank you (probably out loud).
Tips for Getting It Right
- On the beeswax ratio: This recipe uses less beeswax than a lotion bar, and that’s intentional. Body butter should feel like a rich moisturizer, not a balm. If yours feels too waxy, cut back on the beeswax slightly next time.
- On whipping: Make sure the mixture is properly chilled before whipping. Too warm and it won’t hold the air. Too cold and it’ll be tough to whip smoothly. That soft, semi-solid coconut oil texture is the sweet spot.
- On graininess: If your body butter does turn grainy, don’t toss it. Gently remelt it in the double boiler, then chill it quickly in the fridge to reset the texture.
- On cocoa butter: Raw, unrefined cocoa butter has a stronger chocolate scent and keeps more of its nutrients. Refined cocoa butter is more neutral, which is better if you’d rather your essential oils take center stage.
- On heat: The whipped version is more heat-sensitive than the classic. If your home runs warm in summer, store it somewhere cool, or use a little less coconut oil and a little more mango butter for better heat stability.
- On shelf life: Since there’s no added water in this formula, your body butter will last 6 to 12 months stored properly. Keep it away from direct sunlight and moisture, and use clean, dry hands when you scoop.
Final Thoughts
Making your own beeswax body butter takes about 30 minutes of hands-on time, and the results are better than most natural body butters you’d spend serious money on at a wellness store.
You know exactly what’s in it, you can customize it completely to your skin’s needs, and the whipped version makes moisturizing feel less like a chore and more like a treat.
My dry skin in January is basically writing this post in gratitude.
MORE DIY SKINCARE TO TRY NEXT: